---
project:
  type: book
  output-dir: "docs"
  execute-dir: project
---YAML设置
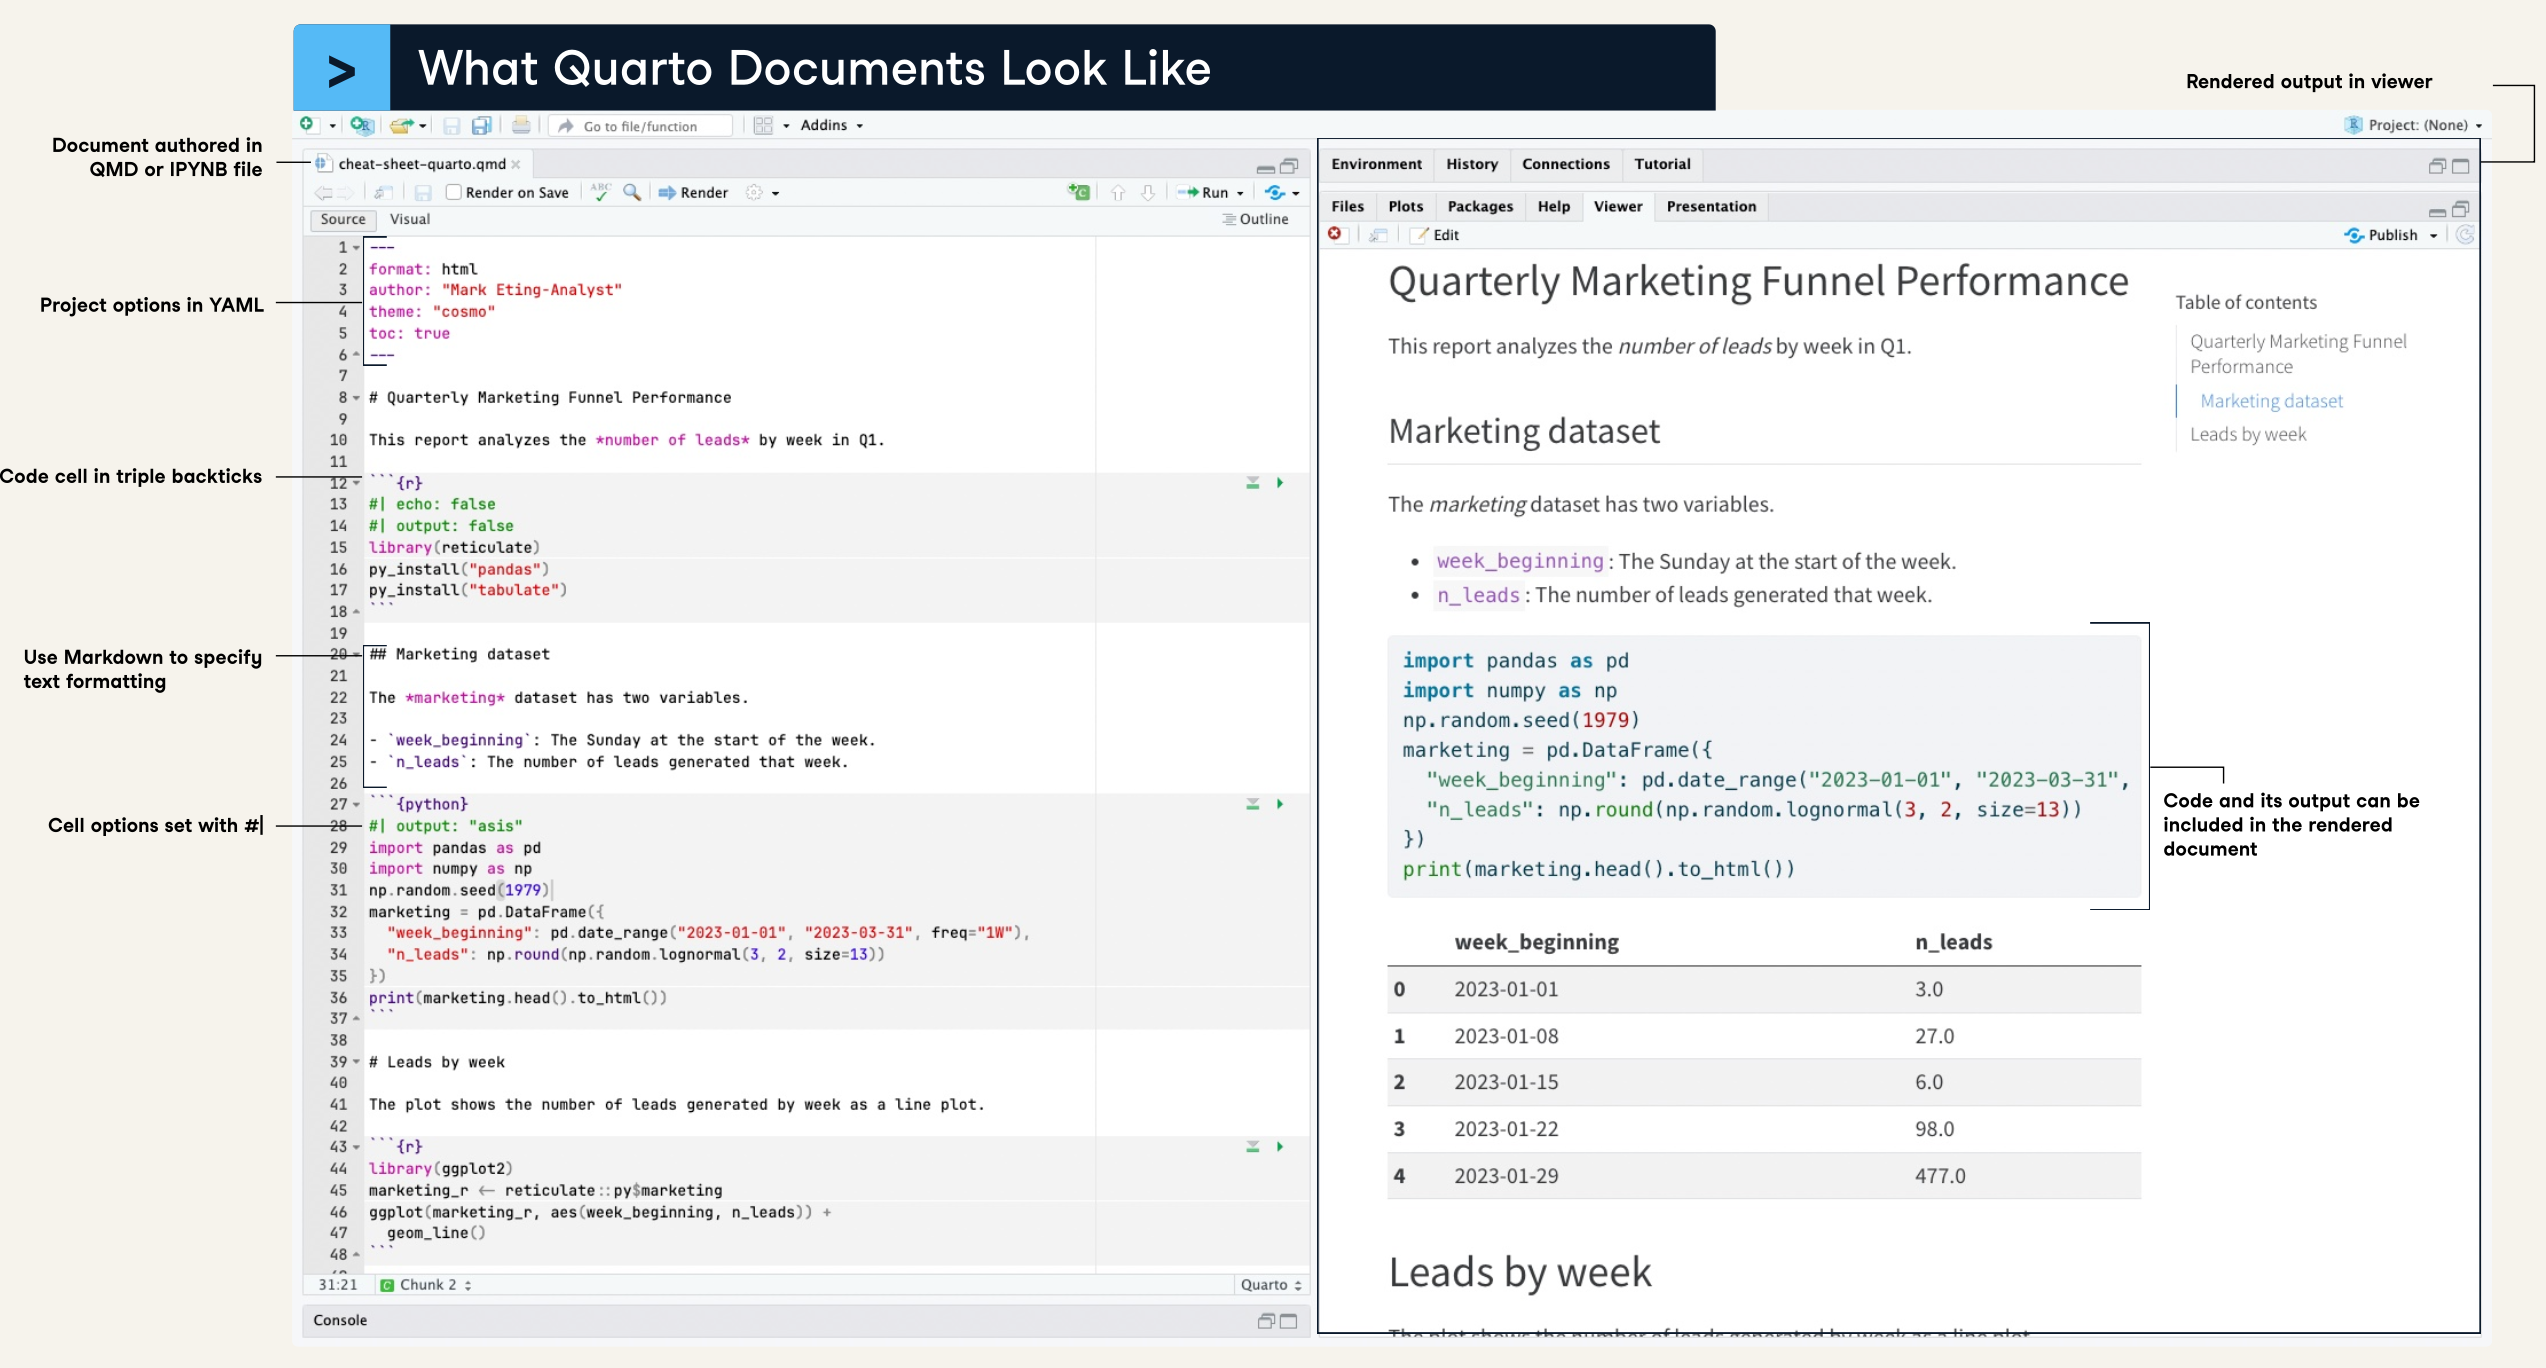
Quarto主要由三大部分组成:metadata, text, 和 code。其中metadata是文档开头写在”—“之间的句子,它采用的是YAML语法,所以有时候也被叫做YAML metadata 或者 the YAML frontmatter。YAML定义了Quarto文档的各种属性,比如编译文件类型、主题、代码块的执行行为以及目录等。在YAML metadata中采用正确的缩进十分重要。
1 project设置
project在编写Quarto Book或者Quarto Websites时使用,因为要创建这些类型的Quarto项目需要通过新建一个Quarto Project来进行,因此YAML中的project项就定义了项目的类型是Quarto Book还是Quarto Websites,以及其他项目的基本设定。并且这些类型的Quarto项目会在根目录中生成一个”_quarto.yml”文件,对于YAML的配置在这个独立的文件中进行,从而将项目内的多个.qmd文档合并编译成一个Quarto Book或者Quarto Websites。
-
project:项目类型。定义了项目编译后的文档类型,包括”default”, “website”(Quarto Websites)和”book”(Quarto Book)。这里我们在新建项目时选择了Quarto Books,所以这里自动填写了”books”。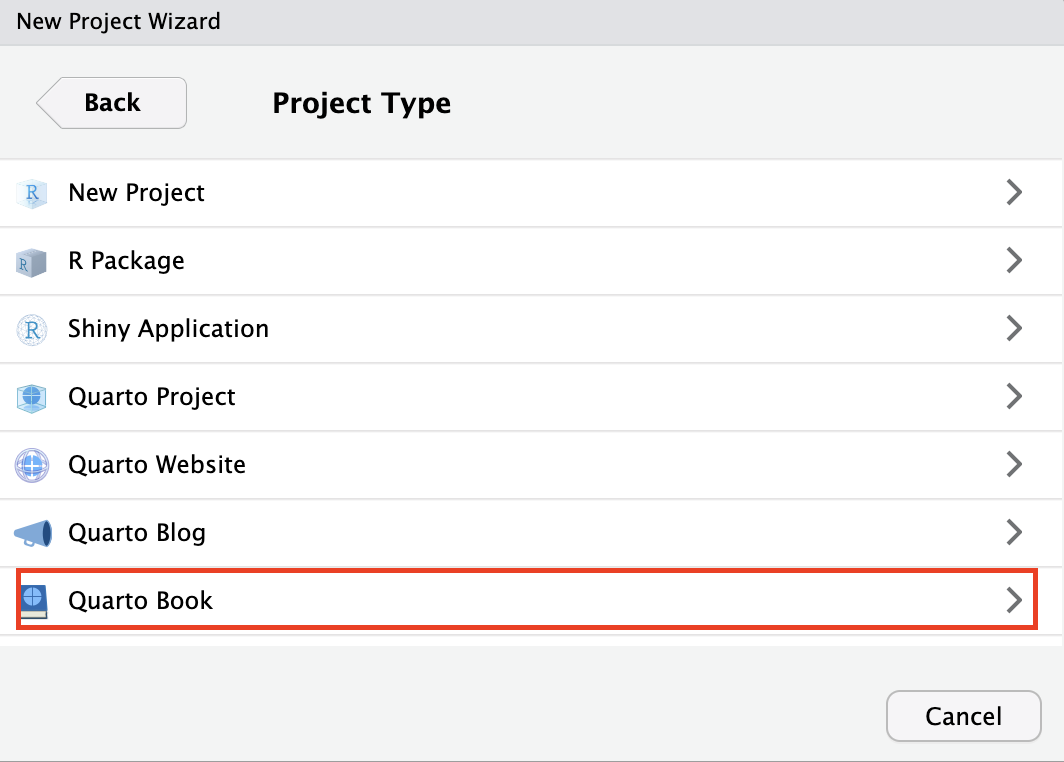
output-dir:输出文件夹。编译后的HTML文件、PDF文件以及运行code chunk后产生的图像、数据等的输出文件夹。上面的例子中将输出文件夹指定为”docs”文件夹可以方便将输出的HTML文件通过GitHub Pages发布。execute-dir:在编译时,各个qmd文件内的code chunk脚本运行的根目录,默认是”file”,即当前qmd文档所在目录,可设置为 “project”,这样在编译过程中执行代码块时会将运行根目录设置为项目根目录。
2 标题/作者/日期信息
对于HTML的编译,这些信息会展示在文档的开头部分。
---
title: Quarto学习笔记
subtitle: 面向多编程语言的新一代R Markdown
author: 杜俊宏
date: 2023/11/10
date-modified: now
date-format: "YYYY[年]M[月]D[日] HH:mm"
author-title: 作者
published-title: 写作日期
---title:标题。subtitle:副标题。在标题下方以较小字号展示。author:作者姓名。author-title:作者栏的标签。默认标签为”AUTHOR”date:文档发行日期。日期既可以手动添加,如”2023/11/10”,也可以通过now(输出样式:2023年11月11日 19:01)或today(输出样式:2023年11月11日)自动生成日期。date-modified:文档的修改日期。date-format:日期格式。published-title:修改date的标签,默认是”PUBLISHED DATE”。
2.1 date-format的设置
date-format通过以下关键词来定义日期格式:
| Style | Description | Example |
|---|---|---|
full |
A full date that includes the weekday name | Monday, March 7, 2005 |
long |
A long date that includes a wide month name | March 7, 2005 |
medium |
A medium date | Mar 7, 2005 |
short |
A short date with a numeric month | 3/7/05 |
iso |
A short date in ISO format | 2005-03-07 |
也可以通过以下语法更加灵活的定义日期格式:
| ormat String | Output | Description |
|---|---|---|
YY |
18 | Two-digit year |
YYYY |
2018 | 四位数年份 |
M |
1-12 | The month, beginning at 1 |
MM |
01-12 | 两位数月份 |
MMM |
Jan-Dec | The abbreviated month name |
MMMM |
January-December | The full month name |
D |
1-31 | The day of the month |
DD |
01-31 | 两位数日期 |
d |
0-6 | The day of the week, with Sunday as 0 |
dd |
Su-Sa | The min name of the day of the week |
ddd |
Sun-Sat | The short name of the day of the week |
dddd |
Sunday-Saturday | The name of the day of the week |
H |
0-23 | The hour |
HH |
00-23 | 两位数小时,24小时制 |
h |
1-12 | The hour, 12-hour clock |
hh |
01-12 | The hour, 12-hour clock, 2-digits |
m |
0-59 | The minute |
mm |
00-59 | 两位数分钟 |
s |
0-59 | The second |
ss |
00-59 | The second, 2-digits |
SSS |
000-999 | The millisecond, 3-digits |
Z |
+05:00 | The offset from UTC, ±HH:mm |
A |
AM PM | |
a |
am pm | |
Do |
1st 2nd … 31st | Day of Month with ordinal |
可以通过”[]“添加自定义字符。通过这些语法,可以定制符合中文语法的日期格式,如:date-format: "YYYY[年]M[月]D[日] HH:mm"
Tip
关于日期的详细指南,详见:https://quarto.org/docs/reference/dates.html。
3 theme主题设置
theme定义了编译文档的主题。可以直接调用Quarto内置的Bootswatch主题,如”default”、“cerulean”和”cosmo”等,也可以通过Sassy Cascading Style Sheets (SCSS)文件来自定义主题。theme参数既可以在YAML中直接定义,也可以在不同的format内定义,这样可以对不同的编译格式应用不同的主题。关于Quarto主题的详细指南,参考Quarto Guide。
---
format:
  html:
    theme: flatly
---
Quarto的HTML文档默认使用Bootstrap 5样式输出(theme: default)。Quarto内置了来自Bootswatch项目的25个主题。下面列出了可用的主题。关于这些主题的介绍详见:https://bootswatch.com。
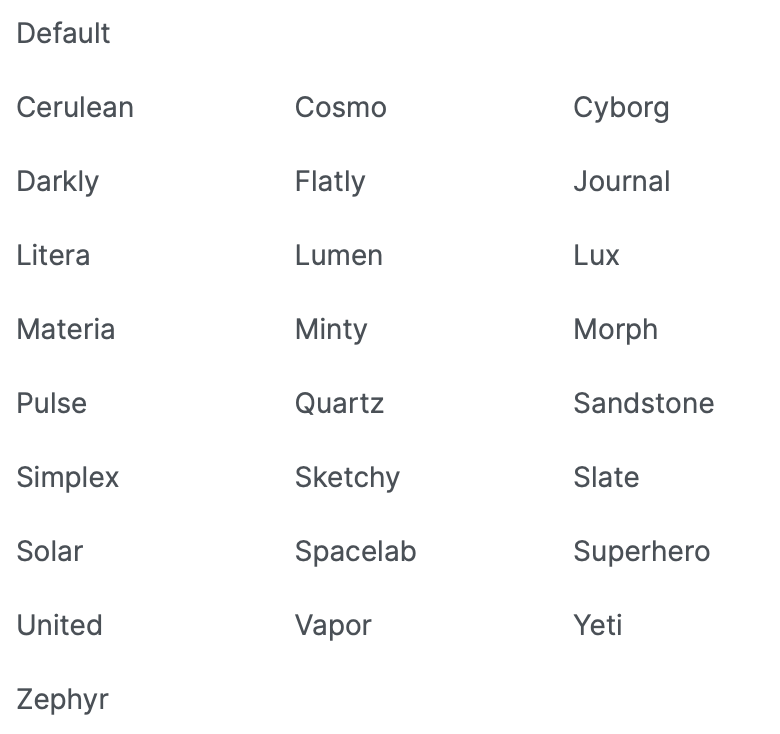
个人认为比较美观、清晰的主题有:Cosmo、Flatly、Lux和Darkly。可以通过light和dark分别设置一套亮色主题和一套深色主题,如:
---
format:
  html:
    theme:
      light: flatly
      dark: darkly
---
这样,在输出的HTML网页的右上角会出现一个亮色/深色模式的切换开关。
4 toc目录设置
和theme一样toc同样可以在YAML中直接定义,也可以在不同的format内定义。
---
toc: true
toc-title: Contents
toc-depth: 2
toc-expand: 2
toc-location: left
---toc:是否显示目录。toc-title:目录的标题。toc-depth:设置目录显示的最低层级(默认为显示到3级标题)。toc-expand:在一开始目录显示到多少级,默认显示到一级标题。当向下浏览内容时目录会自动展开到toc-depth所设置的层级。设置为true时,则在一开始就展开所有目录;设置为false则在一开始折叠所有目录。toc-location:设置目录的位置。默认在右侧(right),可以设置为left或body(在文稿最开头显示)。
5 number-sections标题编号设置
和theme一样number-sections同样可以在YAML中直接定义,也可以在不同的format内定义。
number-sections: true
number-depth: 3number-sections:设置为true时会给各级标题编号。默认为false。number-depth:编号的最低标题层级。默认给所有级别的标题编号。{.unnumbered}:如果想要某一个标题不编号,则把这行命令粘贴到该标题后面。如”第三章{.unnumbered}“。{.unlisted}:将某个标题设置为不在目录中列出。如”第三章{.unlisted}“。如果想要某个标题既不编号也不在目录中列出就可以这样写:”标题{.unnumbered .unlisted}“。
6 排版设置
主要定义了图/表标题的位置、参考文献/脚注的位置、页面大小和页边距等。可以在YAML中直接定义,也可以在不同的format内定义。
---
fig-cap-location: bottom
tbl-cap-location: top
reference-location: margin
citation-location: document
----
fig-cap-location:图片标题的位置。默认在图片底部(bottom)。 -
tbl-cap-location:表格标题的位置。默认在表格上方(top)。 -
reference-location:脚注的默认展示位置。默认为文档最后 (document)。 -
citation-location:参考文献的默认展示位置。默认为文档最后 (document)。
| Option | Description |
|---|---|
reference-location |
Where to place footnotes. Defaults to document.[ document | section | block | margin ] |
citation-location |
Where to place citations. Defaults to document.[ document | margin ] |
cap-location |
Where to place figure and table captions. Defaults to bottom for figures and top for tables. | [top | bottom | margin] |
fig-cap-location |
Where to place figure captions. Defaults to bottom.[ top | bottom | margin] |
tbl-cap-location |
Where to place table captions. Defaults to top.[ top | bottom | margin] |
7 execute代码块执行设置
execute用来指定代码块的执行行为,例如是否运行、是否显示警告信息和是否缓存运行结果等。
---
execute:
      eval: false
      warning: false
      cache: true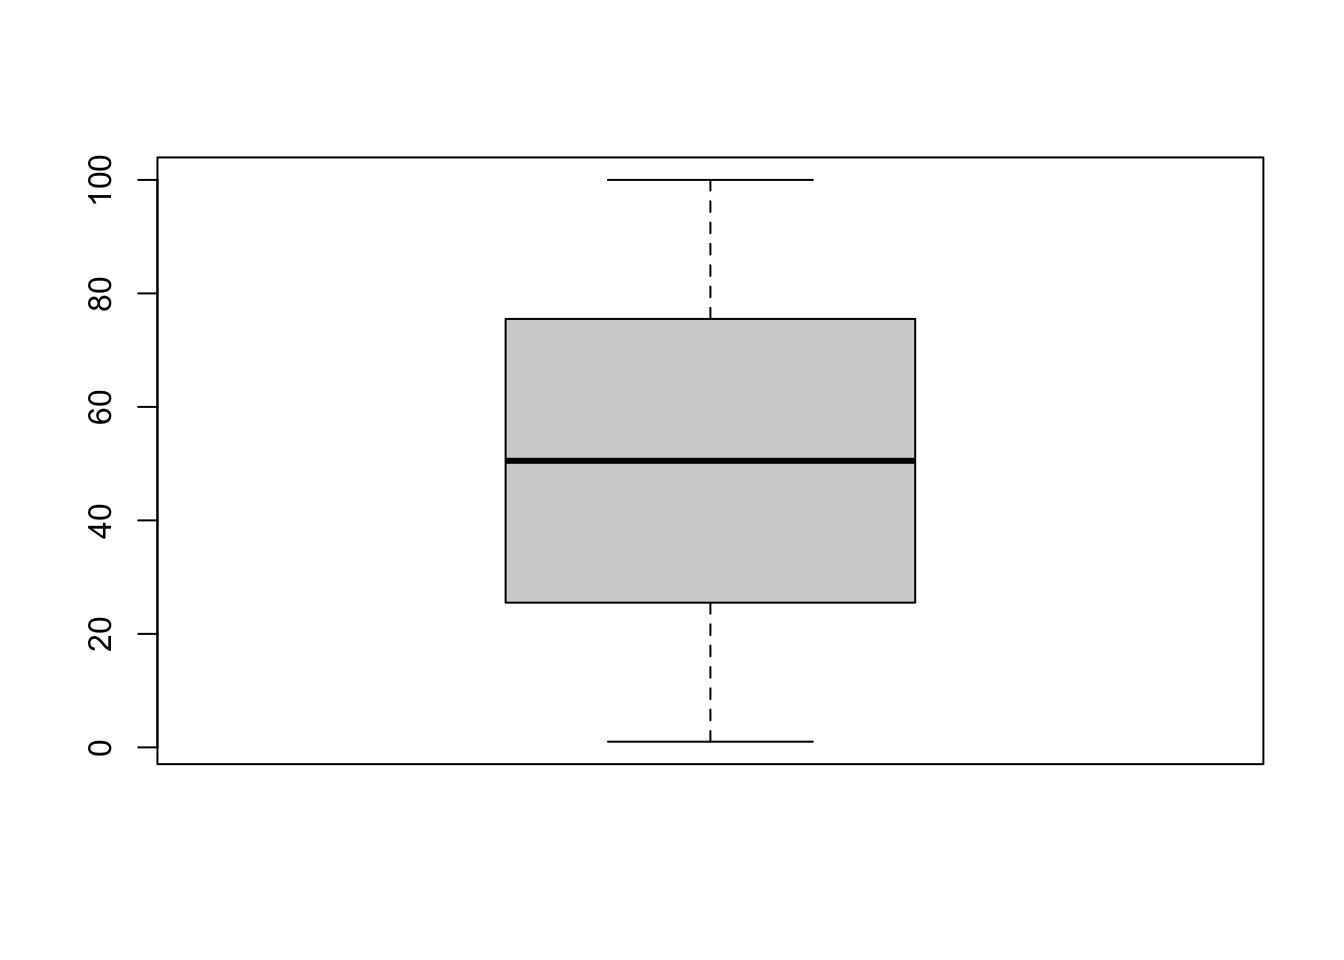
---eval:设置为false时只显示代码,不运行。默认为true。echo:设置为false时在输出文件中不显示代码,仅显示代码的运行结果。设置为fenced,会将代码块的设置,即”#|“符号后的内容,也展示出来。Figure 1 这个代码块就用了echo: fenced这个设定,可以看一下效果。默认为true。output:设置为false时,只运行代码不显示运行结果。默认为true。warning:是否显示代码运行的警告信息。默认为true。cache:是否开启运算结果缓存。默认为false。如果设置为true,就会在编译时将源代码的运算结果保存到文件目录中后缀为”_cache”的文件夹中。这样在重新编译同一个文档时会加快编译速度。
除了对代码执行行为的全局设置,我们也可以针对每个代码块设置其执行行为。许多参数和YAML中的语法相似,只不过需要在每个参数前加上”#|”符号。如:
```{r}
#| eval: true
#| warning: false
#| output: true
#| label: fig-箱型图
#| fig-cap: 箱型图
boxplot(1:100)
```
Caution
有时候当一个代码块需要读取一个较大的对象时(如包含大量细胞的Seurat对象),尽管运行该代码块不会报错,但是在编译时可能会出现如下报错:
long vectors not supported yet: /Volumes/Builds/R4/R-4.3.2/src/main/connections.c:6093这时我们可以通过添加#| cache-lazy: false命令,取消延迟缓存来解决这个问题:
```{r}
#| cache-lazy: false
library(Seurat)
seurat_integrated <- readRDS("output/scRNA-seq_online/seurat_clustered.rds")
```
8 crossref交叉引用设置
crossref定义了图/表的标签、默认引用样式、编号类型等。
---
crossref:
  fig-title: 图
  tbl-title: 表
  title-delim: ":"
  fig-prefix: 图
  tbl-prefix: 表
  sec-prefix: 章节
  ref-hyperlink: true
  fig-labels: arabic
  tbl-labels: arabic
  subref-labels: alpha A
---fig-title: 图的默认标签文字(默认是”Figure”)tbl-title: 表的默认标签文字(默认是”Table”)title-delim: 图、表标签文字和后面的图、表标题之间的连接符(默认是”:“)fig-prefix: 图的默认引用样式(默认是”Figure”)tbl-prefix: 表的默认引用样式(默认是”Table”)sec-prefix: 章节的默认引用样式(默认是”Section”)ref-hyperlink: 是否为交叉引用加上内部链接(默认是”true”)fig-labels: 图片的编号类型(默认是阿拉伯数字:arabic)tbl-labels: 表格的编号类型(默认是阿拉伯数字:arabic)subref-labels: 次级引用编号类型,如组图中的小图(默认是小写字母:alpha a)
可用的编号类型包括:
arabic(1, 2, 3)roman(I, II, III, IV)roman i(i, ii, iii, iv)alpha x(start from letter ‘x’)alpha X(start from letter ‘X’)
9 参考文献设置
只要在编辑qmd文档时插入了参考文献,YAML中会新增参考文献的配置选项:bibliography: references.bib。同时根目录下会生成一个名为”references.bib”的参考文献配置文件。该配置文件包括了qmd文档中所插入的所有参考文献的列表。以BibTeX/Citation风格语言编写。bibliography指定了这个参考文献配置文件所在的路径。
---
bibliography: references.bib
---
10 format编译设置
format定义了qmd文档编译后的文件类型,例如:“html”, “pdf”, “docx”, “odt”, “pptx”, “revealjs”, “beamer”, “gfm”(GitHub风格的Markdown文档), “commonmark”, “mediawiki”, “epub”, “ipynb”。不同的编译格式对应的子项设置各不相同,有些参数适用于某些格式但是在另一些格式中则无法兼容。所有支持的编译格式详见Quarto官方文档。下面的案例为编译HTML和GFM的常用设置。
---
format:
  html:
    theme:
      light: flatly
      dark: darkly
  gfm:
    toc: true
    toc-depth: 1
    number-sections: true
    citation-location: document
    output-file: "README.md"
---编译Quarto文档时,首先knitr将运行所有代码块,并创建一个新的markdown(.md)文档,其中包括源代码及其输出结果。接下来,生成的markdown文件经过pandoc(RStudio内置了pandoc)处理后,被转换成HTML、PDF或者Word等我们需要的文档格式。RStudio封装了这些操作,当我们完成Quarto编辑,点击渲染时,就会完成上述过程。
Quarto的渲染工作流

10.1 编译HTML
---
format:
  html:
    theme:
      light: flatly
      dark: darkly
    embed-resources: false
    code-tools: true
    title-block-banner: images/banner.jpg
    title-block-banner-color: "black"
    toc: true
    toc-title: 目录
    toc-location: left
    toc-depth: 2
    toc-expand: 1
    number-sections: true
    number-depth: 3
    anchor-sections: true
    link-external-icon: true
    link-external-newwindow: true
    df-print: kable
    code-link: true
---theme:主题。同 Section 3 。embed-resources:是否将所有源文件嵌入HTML文件以方便分享。默认为”false”。code-tools:是否在网页右上角显示”<code>“按钮。点击该按钮可以看到Quarto文档的原始markdown代码。-
title-block-banner:标题横幅设置。title-block-banner有以下选项:true:将标题以网页横幅的形式展示,样式为them中所选样式的默认样式。具体颜色:如
title-block-banner: "#003262"。图片路径:如
title-block-banner: images/banner.jpeg。
toc相关设置:同 Section 4 。number-sections、number-depth:同 Section 5 。anchor-sections: 设置为true时,当鼠标移到各级标题上时会显示anchor link,方便我们复制直接定位到该标题的超链接。link-external-icon:设置为true时会在外部链接上显示一个小图标。link-external-newwindow:是否在新标签页打开外部链接。df-print:表格输出样式-
code-copy:设置代码复制按钮:true: 总是在代码块右上角显示代码复制按钮。false: 隐藏代码复制按钮。hover:(默认)当鼠标移过时显示代码复制按钮。
code-fold: 是否折叠代码。code-link: 是否自动为函数加上超链接。该功能基于downlit包,可以自动为识别到的函数加上一个链接到官方文档的超链接。
10.2 编译GitHub Flavored Markdown(GFM)
我们可以将Quarto文档转换为GitHub风格的Markdown文档(GitHub Flavored Markdown,GFM)。这可以用来生成GitHub项目的README.md文档。
---
title: "My Project"
format:
  gfm:
    identifier-prefix: readme # 标识符
    # preview-mode: raw # 预览原始markdown
    keep-yaml: true
    toc: true
    toc-depth: 1
    number-sections: true
    citation-location: document
    output-file: "README.md" # 输出文档的文件名
---
10.3 编译PDF
如果要在rmarkdown、bookdown中使用PDF输出功能, 可以在在R中安装tinytex扩展包并安装TinyTeX编译软件:
install.packages('tinytex')
tinytex::install_tinytex()
其中上面第一行命令安装R的tinytex扩展包, 第二行将下载LaTeX编译程序的服务器设置为清华大学tuna镜像站, 第三行安装LaTeX编译程序。
如果安装成功, TinyTeX软件包在MS Windows系统中一般会安装在 C:\Users\用户名\AppData\Roaming\TinyTeX目录中, 其中”用户名”应替换成系统当前用户名。 如果需要删除TinyTeX软件包, 只要直接删除那个子目录就可以。
为了判断TinyTeX是否安装成功, 在RStudio中运行:
tinytex::is_tinytex()结果应为TRUE, 出错或者结果为FALSE都说明安装不成功。
当用户使用RMarkdown和tinytex包转换latex并编译为PDF时, 如果缺少某些latex宏包, tinytex会自动安装缺少的宏包。